Tutorial
How to Use Screen Studio From Recording to Export
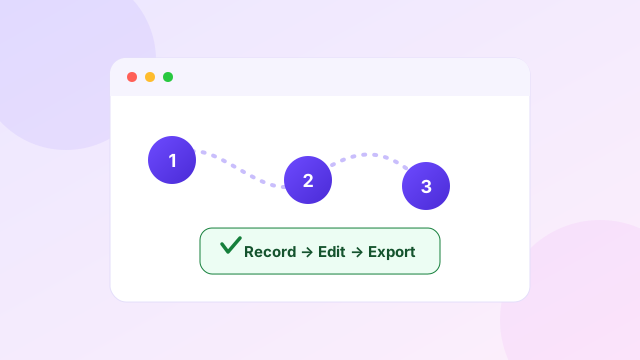
Screen Studio follows a simple path: install the Mac app, grant recording permissions, choose what to capture, record your actions, review the automatic zooms, make small edits and export a file or shareable link.
The app handles much of the visual polish. Your main job is to record a clear path and remove anything that distracts from it.
This is an educational tutorial. Some links on this page are affiliate links, which may earn us a commission at no extra cost to you.
What you need before starting
Screen Studio is designed for macOS. The official product page recommends macOS Ventura 13.1 or later. Check the current system requirements page when using an older Mac or a new macOS release.
Prepare:
- enough free disk space for the recording and export;
- a microphone if you plan to narrate;
- a webcam if your face will appear;
- permission to record the app or data on screen; and
- a short list of the steps you need to show.
Close private tabs and pause notifications. Use a demo account when recording customer-facing software.
-
Install and activate Screen Studio
Download Screen Studio from the official website and move the app into the normal Applications folder if macOS asks. Open it and follow the activation screen for your subscription or existing licence.
macOS may warn that the app was downloaded from the internet. Confirm that the file came from Screen Studio before opening it.
If activation fails, check that the account email and licence are correct. The official guide has separate help for installation, activation and account access.
-
Grant recording permissions
Screen Studio needs macOS permission to capture the screen and use a camera or microphone. The exact names and locations can change by macOS version, but they are normally found under Privacy and Security in System Settings.
Grant only the permissions needed for your recording. You may need to restart the app after changing screen-recording access.
Make a short test. Check that the screen is visible, the microphone has a signal and the right camera appears. A ten-second test can prevent a long silent recording.
-
Choose what to record
Open the recording picker and select one of the main capture types:
Entire display
Use the full display when the tutorial moves between several apps. Hide desktop icons, unrelated menus and messages first.
Single window
Use one window for a clean product demo. This lowers the risk of recording private content from another app.
Selected area
Use an area when you need exact dimensions or want to crop a large interface before recording.
iPhone or iPad
Connect a supported iOS device to the Mac for mobile-app demos. Screen Studio can detect supported device models and add a suitable frame.
Choose the smallest capture that contains the complete task. A tighter source stays clearer after the video is placed inside a background.
-
Select camera, microphone and audio
Choose the microphone and camera in the recording picker. Look at the camera framing before starting. Leave some space around your face, use front light and avoid a bright window behind you.
For system sound, choose all-app audio or a selected app. Selected-app recording is useful when the video needs sound from a browser or product but should ignore other apps.
Screen Studio can normalise voice volume and reduce background noise. Still record in a quiet room and keep the microphone close. Audio enhancement works best on a clean source.
-
Record a clear path
Start the recording and wait a moment before speaking. Move the cursor with purpose. Complete one step at a time and pause briefly when a result appears.
Screen Studio supports pause and resume. Use pause when you need to prepare the next state, but check that the transition still makes sense to a viewer.
If you make a small mistake, pause, repeat the sentence and continue. You can cut the bad section later. Restart only when the workflow itself has become confusing.
-
Review automatic zooms
Screen Studio places automatic zooms around actions. Play the recording and look at each one.
- Keep a zoom when it makes small text or a menu easier to see.
- Move it when the focus arrives too early or late.
- Lengthen it when the viewer needs to read.
- Delete it when camera movement adds no value.
- Add a manual zoom when the important detail is not connected to a click.
The official guide includes separate controls for instant zoom, automatic zoom, manual zoom and disabling automatic zooms. You do not have to accept the default behaviour for every project.
Avoid several zooms in a few seconds. A wider pause gives the viewer a visual rest.
-
Edit the cursor
Screen Studio records cursor movement and can smooth the path. You can change its size after recording, select cursor styles, hide it in certain sections and add click sounds.
Increase the cursor for a mobile viewer. Check that it does not cover the button or text being shown. Use click effects with care. They are helpful in a tutorial but can make a short brand video feel busy.
For a looping demo, set the cursor to return near its first position by the end.
-
Trim, cut and speed up
Trim the empty start and end. Cut mistakes, loading waits and repeated words. Speed up typing or slow actions where the viewer understands what is happening.
Screen Studio can detect typing sections and suggest faster playback. Review the result with sound. A speed change may make narration or system audio hard to follow.
Keep a pause after the main result. New users need more time than the person who recorded the product.
-
Change the look and layout
Open the look controls and choose:
- background colour or wallpaper;
- space around the recorded screen;
- rounded corners;
- shadow and inset;
- horizontal or vertical aspect ratio; and
- camera placement.
Use a simple background and enough spacing to separate the app from the frame. Too much spacing makes interface text small.
Dynamic camera layouts can move between a camera bubble and a larger presenter view. Use a full camera moment for the opening or closing, then let the product fill most of the video.
Save a preset for repeated videos. Shared presets help a team keep the same background, cursor and layout.
-
Add captions, music and masks
Generate a transcript and review every line. Correct product names, numbers and keyboard commands. Screen Studio says transcript generation happens on the Mac.
Add background music only when it supports the video. Lower it enough for every spoken word to remain clear.
Use a mask for sensitive data or a highlight to direct attention. Watch the masked area across the full section, especially if the page scrolls or changes layout.
-
Export or create a shareable link
Screen Studio exports MP4 video up to 4K 60fps and optimised GIFs. Choose a preset based on the destination.
- Use 1080p MP4 for most tutorials and help pages.
- Use 4K when the interface contains very small details or the file will be edited again.
- Use vertical or square output for mobile social posts.
- Use a GIF for a very short silent loop.
- Use a shareable link for review and comments.
The app can also copy an exported video to the clipboard. This is handy for a short file in chat or a social post.
Private shareable links, comments and view counts were added through later Screen Studio updates. Check access before sending client or internal content.
A first recording checklist
Before you publish, confirm:
- The first frame is clean.
- No private information appears.
- Voice and system audio are balanced.
- Every zoom has a reason.
- Cursor size works on a phone.
- Captions spell product terms correctly.
- The result remains visible long enough.
- The final format matches its destination.
- The link or file opens on another device.
Watch the workflow in motion
Reading steps is one thing; seeing the recorder, the zoom track and the export dialog on a real screen is faster. This independent walkthrough covers the same path as this tutorial — recording settings, automatic zooms, cursor styling, backgrounds, captions and export options.
Video summary: The creator opens Screen Studio, walks through the recording settings, then demonstrates the editing features this tutorial describes — automatic zooms, cursor smoothing and sizing, background frames and caption generation — before finishing with the export options. Watch it alongside steps 5–11 above; the timeline controls shown match the current app version.
Common Screen Studio mistakes
The most common mistake is recording before deciding what the viewer should learn. Automatic editing cannot make a wandering demonstration clear.
Another mistake is leaving every automatic zoom in place. Review them as you would review cuts. Remove any movement that does not guide attention.
Users also export 4K by default when 1080p would load faster and look the same in the final player. Choose resolution based on the interface and destination.
Finally, do not use a shareable link as a permanent video library without checking limits. Export important source and final files to your own organised storage.
Screen Studio pricing
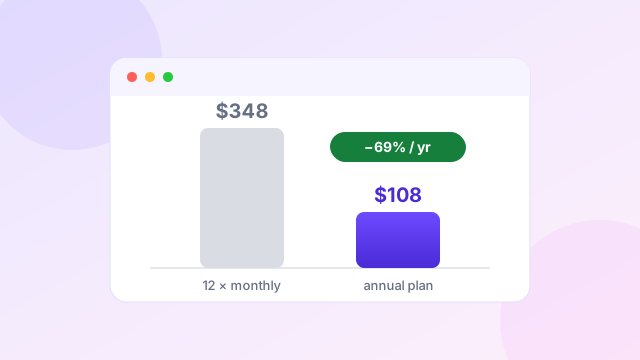
Screen Studio currently costs $29 per month or $108 per year. The annual plan equals $9 per month and becomes cheaper than monthly billing once you use the app for four months.
Read the Screen Studio coupon page and pricing guide before purchase. For use-case advice, see our product demo workflow.
Frequently asked questions
Is Screen Studio easy to use?
Yes. Its editor focuses on common screen-video tasks. A clear recording plan still matters more than any automatic effect.
How do I add automatic zoom?
Screen Studio creates zooms around actions. Open the zoom track to move, resize, remove or add ranges.
Can Screen Studio record system audio?
Yes. It can record sound from every app or from selected apps.
Can Screen Studio record an iPhone?
Yes. Connect a supported iPhone or iPad to the Mac and select it as the recording source.
Can I import an existing video?
The official guide includes creating a project from an existing video. Recent versions support common MOV and MP4 workflows.
How should I export for LinkedIn?
Use a square or vertical layout, increase cursor size and check that interface text remains readable on a phone.
Keep learning
Sources and editorial note
This guide follows the official Screen Studio Guide, product page and changelog, checked on 20 July 2026. It is an educational page, so the main text does not use a heavy coupon block.