Tutorial
How to Make Product Demos With Screen Studio
A good product demo does not show every feature. It shows one problem, one useful path and one clear result. Screen Studio helps by adding automatic zoom, smooth cursor movement, clean framing and quick export settings after you record.
The tool can make a plain capture look polished, but it cannot repair a confusing story. Plan the click path first, clean the screen and keep the final demo short.
This guide contains an affiliate link. We may earn a commission if you purchase Screen Studio through it.
The product demo workflow
| Stage | Main task | Screen Studio feature |
|---|---|---|
| Plan | Pick one audience and outcome | No tool needed |
| Prepare | Clean the app and remove private data | Window capture and masks |
| Record | Capture screen, voice and optional camera | Recording picker |
| Guide attention | Keep the viewer on the right action | Automatic and manual zoom |
| Edit | Remove delays and errors | Cut, trim and speed tools |
| Brand | Add a consistent visual frame | Background, spacing and presets |
| Publish | Create the right file or link | 4K video, GIF and shareable links |
-
Start with one promise
Write one sentence before recording:
By the end of this video, the viewer will know how to [complete one task].
Examples:
- create a report from raw campaign data;
- invite a teammate and assign work;
- remove a photo background;
- set up an automated email; or
- compare two pricing plans.
If the sentence contains “and” several times, the demo is too broad. Make a second video instead of forcing five features into one recording.
This choice improves everything that follows. The cursor moves less. Automatic zoom has a clearer path. The voice-over becomes shorter. The call to action feels natural.
-
Build a simple demo script
Use five small sections:
- Problem: Name the job or pain in one sentence.
- Starting point: Show where the user begins.
- Action: Complete the important clicks.
- Result: Pause long enough for the outcome to be understood.
- Next step: Tell the viewer what to do after watching.
Do not write a full essay unless you need a teleprompter. A list of short prompts often sounds more natural. Mark the places where you will pause, click or wait for a page to load.
For a 60-second demo, aim for roughly 120 to 140 spoken words. Interface actions need breathing space, so a slower pace is often clearer than a fast sales voice.
-
Prepare the screen before recording
Clean preparation saves more time than editing.
- Close unrelated apps and browser tabs.
- Turn off notifications and messaging previews.
- Use demo data rather than a real customer account.
- Hide personal files and desktop icons.
- Increase the app’s text size if the interface is dense.
- Set the browser zoom before recording.
- Use a clean test account with a predictable state.
- Load every page once so slow assets are cached.
Screen Studio can hide desktop icons and add masks over private areas, but prevention is safer than fixing a leak later. Never rely on a mask for information that should not be recorded at all.
-
Choose the right capture area
Screen Studio can record a display, one window or a selected area.
Record one window when the product lives inside a single app and you do not need menus outside it. This keeps the frame clean and prevents unrelated content from appearing.
Record an area when you need exact dimensions or only one part of a large screen. Use the same dimensions across a series so the videos feel consistent.
Record the full display when the demo moves between several apps. Clean the desktop first and test how the final wide recording looks inside a smaller player.
The official product-demo page recommends selecting the app window, choosing the microphone and webcam, adding zoom, then exporting with the right format and compression preset.
-
Record microphone and system audio carefully
Select the microphone before you begin. Make a ten-second test and listen with headphones. Check room noise, keyboard sound and the distance from your mouth.
Screen Studio can capture system audio from all apps or selected apps. Use selected-app audio when your demo includes sound from the product but should ignore alerts from other software.
The app can normalise voice volume and reduce background noise. These tools help a decent recording. They cannot fully repair a microphone across the room or a loud fan beside the laptop.
If narration makes you rush the clicks, record a quiet screen pass and add a separate voice track in another editor. Screen Studio is strongest when screen and voice can be captured together without many retakes.
-
Use automatic zoom as a guide
Automatic zoom follows actions and makes a detailed interface easier to read. Treat the first set of zooms as suggestions.
Watch the complete recording once. Remove zooms that arrive too often or focus on an unimportant click. Move ranges when the viewer needs a moment to read a form. Add a manual zoom when the important detail is not tied to a cursor action.
Good zoom has a reason:
- a small menu opens;
- a value changes;
- a button needs attention;
- a result appears; or
- a form field contains the key step.
Do not zoom for every click. Constant camera movement makes a short demo tiring. Leave wider sections between important actions.
-
Make the cursor easy to follow
Screen Studio smooths the cursor path and lets you change its size after recording. Increase it enough to be seen on a phone, but not so much that it covers labels.
Use click effects or sounds only when they help. A software tutorial may benefit from a quiet click marker. A premium landing-page video may look cleaner without sound effects.
The app can hide the cursor during sections where it stays still. It can also return the cursor to its first position for a loop. This is useful for a silent GIF or a short social clip that repeats.
-
Edit for pace
Remove setup time, loading pauses, incorrect clicks and repeated explanations. Speed up sections where the viewer understands the action but does not need to watch every second.
Screen Studio can detect typing sections and suggest speeding them up. Keep enough of the action visible so the result does not appear by magic. A viewer should understand what was entered, even when they do not watch every keystroke.
Use a short pause after the main result. Product teams often cut too quickly because they already know the interface. A new viewer needs time to see what changed.
-
Add a clean visual style
Choose a background that supports the product rather than fighting it. A simple solid colour, soft wallpaper or brand shade is enough. Adjust spacing so the app window has room without making its text too small.
Keep the shadow and inset restrained. The goal is a readable interface, not a decorative frame. Save the choices as a preset when several people create videos for the same brand.
Screen Studio presets can be saved and shared. This helps a team use the same background, spacing, cursor size and export format.
-
Add captions and protect private data
Generate the transcript and correct names, prices and product terms. Captions help viewers watching without sound and improve access for people who find speech hard to follow.
The official site says transcript generation happens on the Mac. Even so, review the final subtitles. Speech recognition can misread uncommon brand names and technical language.
Use masks for any private information that slipped into the recording. Watch frame by frame around scrolling or moving panels. A mask placed over one moment may not cover data after the layout changes.
-
Export for the destination
Choose the destination before the final export.
Suggested export formats by destination Destination Suggested format Practical note Landing page MP4, 1080p or 4K source Keep file size reasonable for page speed YouTube tutorial MP4, 16:9 Use captions and a clear spoken opening LinkedIn or X MP4, square or vertical Increase cursor and interface size Help centre MP4 or shareable link Keep each video focused on one task Email or chat Shareable link Check privacy access before sending Short silent loop Optimised GIF Keep the action brief and repeatable Screen Studio exports up to 4K 60fps. Most software demos do not need 60fps unless animation or fast movement is important. A clear 1080p export is often easier to load and share.
Watch a demo-polishing workflow in Screen Studio
This short independent video shows the exact polish steps this guide covers — trimming clips, adjusting audio with noise reduction and background music, and customising the cursor with click effects and sounds — inside the Screen Studio editor.
Video summary: In about three minutes the creator demonstrates a product-demo polishing pass: trimming the recording, tuning audio (noise reduction, music bed), then styling the cursor — size, style, click effects, click sounds and even hiding it when it distracts. These are the same controls referenced in steps above, so you can follow along inside your own project.
Product demo mistakes to avoid
Do not begin with a long logo animation. Show the product quickly.
Do not move the cursor while talking about something else. Keep the pointer close to the part being discussed.
Do not show real customer records, emails or payment details. Use a prepared demo account.
Do not make one video answer every question. A small library of focused demos is easier to update.
Do not trust automatic zoom without review. Automation speeds up editing, but the final decision still belongs to the creator.
Is Screen Studio worth using for demos?
Yes, when you work on a Mac and make product videos regularly. Its value comes from removing repetitive editing work. Automatic zoom, cursor treatment, framing and export presets can turn a useful recording into a publishable asset quickly.
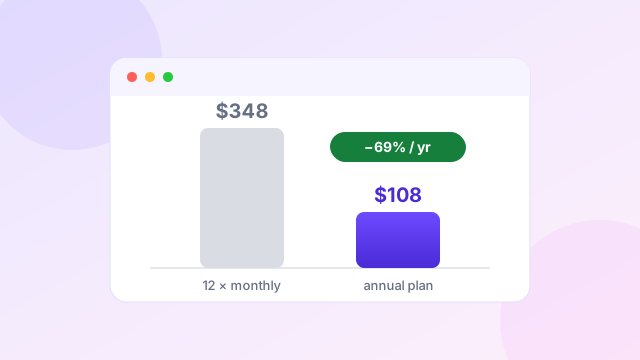
The annual plan currently costs $108. The monthly plan is $29. Read our Screen Studio review and Screen Studio pricing guide before choosing. If you record quick team updates rather than polished demos, compare it with Loom in our Screen Studio vs Loom guide.
Frequently asked questions
How long should a product demo video be?
Keep a simple feature demo between 45 seconds and three minutes. A teaching video can be longer when each section supports the same task.
Does Screen Studio add zoom automatically?
Yes. It creates zooms around screen actions. You can edit, remove or add zoom ranges on the timeline.
Can Screen Studio record product audio?
Yes. It can record system audio from all apps or selected apps, alongside microphone and webcam input.
Can I make vertical product demos?
Yes. Screen Studio supports vertical output and adjusts zoom animations for the new aspect ratio.
Does Screen Studio create captions?
Yes. It can generate a transcript on the Mac and use it as subtitles. Always correct product names and technical terms.
Can I share a demo without exporting a file?
Yes. Screen Studio provides shareable links, including privacy and comment features added through recent versions.
Keep learning
Sources and editorial note
Workflow and feature details were checked against the official Screen Studio product demo page, main product page and Screen Studio guide on 20 July 2026. The purchase link is an affiliate link.